Check Out Items to Departments
The To Department checkout option lets you track temporary loans and reallocate resources. For example, you might check out basketballs and soccer balls to the Math department for a geometry lesson.
Destiny checks out items to department using the loan periods defined in Admin > Resource Policies. To permanently assign a resource to a department, Follett recommends you update the department on record using either Update Resources or Edit Item in the Catalog.
- Select Circulation > Check Out Items > To Department sub-tab.
- If the Site drop-down is available, select the appropriate site.
- From the Department drop-down, select the appropriate department.
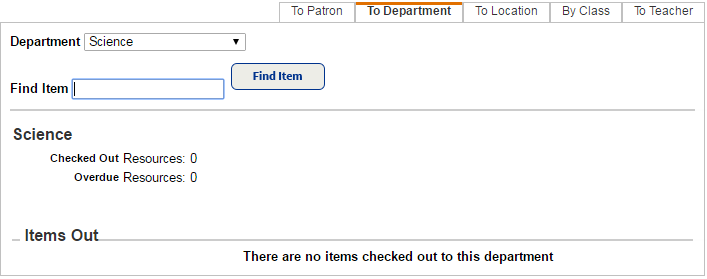
- In the Find Item field, scan or type the first item’s barcode. The item appears in the Checked Out section. Scanning a second item moves the first item to the Items Out section.
- To edit the due date for the item in the Checked Out section, click Change Date. Select the new due date and whether it is for this item, this patron or the rest of this session.
- To print a receipt that includes current checkouts and outstanding fines, click Print Receipt. To print a receipt that includes only today's checkouts, select the Only today's check outs checkbox before you click Print Receipt.
- Click Reset to clear the completed checkout and begin checking out a new department.
Checkouts
Checkouts do the following:
- Honor the due date assigned in the "by class date range" loan period type.
- Allow textbooks that use the textbook template to be checked out for any of the existing Resource Manager loan period types.
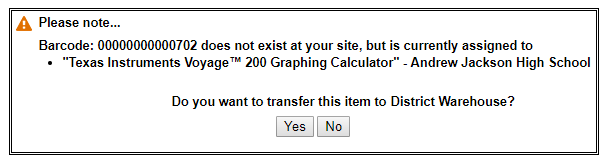
In-Hand Transfers During Checkout
An in-hand transfer is when an item or container from another site in your district is scanned at your site, and then transferred to your site.
|
Notes:
|
|
Example: An item in your district is scanned at your site, but it is currently assigned to another site in the district.
|
Change the Due Date
To change the due date of the item in the Checked Out section:
- Click Change.
- On the Due Date page that appears, select the option on the left. If you select Selected date:
- Enter a date in the Selected date field,
- Select a date on the calendar, or
- Select a Loan Period from the list.
- Click Save.
The Special Date prompt then appears in front of the date.
To change the due date of any of the items listed under Items Out, you will need to check them out again.