Generate a
Fine History Report (a Cash Flow Report for Fines)
The Fine History report lets you keep track of fine payments and refunds made during a specific time period.
This report includes only fines on which a payment (partial or full) or refund has been made. It includes payments and refunds made here for off-site fines, if any.
After setting up your report, you can save it. When you save a report setup, it appears on the Saved Reports sub-tab. From there, you can run it later, edit it, duplicate it or delete it. Each time you run the report, the results reflect the current contents of your collection.
Generate a Report
- Select Reports > Patron Reports.
- Under Circulation, click Fine History.
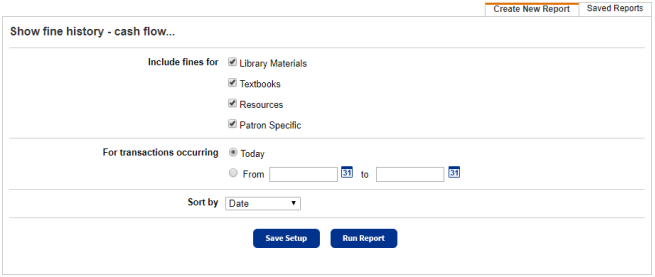
- To limit the report to certain types of fines, deselect the checkboxes next to Include fines for.
- Library Materials includes all fine types that are copy-specific (system-supplied or user-defined) and were assessed for library materials.
- Textbooks includes all fine types that are copy-specific (system-supplied or user-defined) and were assessed for
- Resources includes all fine types that are item-specific and were assessed for resource items.
- Patron Specific includes all user-defined fine types that are Patron Only.
- Next to For transactions occurring, either select Today, or select From and enter a date range for the transactions
When specifying a range:- Leave both fields blank to include all fine transactions
- Leave the From field blank and enter a date in the to field to include all fine transactions up to and including the date in the to field.
- Enter a date in the From field and leave the to field blank to include fine transactions from that date onward.
- Enter the same date in both fields to see fine transactions for one day.
- Leave both fields blank to include all fine transactions
- Use the Sort by drop-down to select one of the following:
- Date
- Patron: The patron name
- Reason: The reason for the fine
- Performed By: The user name of the person who collected the money or paid the refund
- To run the report now, click Run Report. Report Manager appears.
- (Optional) To save the setup, click Save Setup.
- On the Save Report page, enter a name for the report.
Note:
- Either:
- Click Save to save the report
- Click Save and Run to save the report setup and run the report now.
- On the Save Report page, enter a name for the report.
Saved Fine History Reports
Once you save the report setup, it appears on the Saved Reports sub-tab, where you have more options for working with it:
- Add to Favorites: Click
 , the Add to Favorites icon, to add a Saved Report to your My Favorites list. Saved reports already in your My Favorites list are designated with a
  .
.
- Run: Click Run to run the report. When you run a saved Fine History report with a date limiter, Destiny displays the saved date and reminds you to change it. Each time you run the report, the results reflect the current contents of your collection. Other users with permission to run reports can also run your Saved Reports.
- Edit: Click
 , the edit icon, to edit the report. When you edit a saved report setup and re-save it, the original report setup is overwritten, even if you used a different report name.
- Duplicate: Click
 , the duplicate icon, to copy an existing report. This is a quick way to create one or more additional Saved Reports based on the configuration of the original.
- Delete: Click
 , the delete icon, to remove the report. Destiny notifies you if the report is a favorite of any other users. When you delete a Saved Report, previous reports from the Saved Report are not deleted from the Report Manager.
Report Content
For each fine payment or refund, the report includes the following information:
- The date the payment or refund was made
- The patron's name and barcode number and Short Site Name for off-site patrons
- The library, textbook title or resource name and component name, if needed
- The copy or item barcode number and Short Site Name for off-site copies
- The reason for the fine, linked to the Fine Details page
- The type of checkout: LM (library materials), TB (textbook) or AM (resource)
- The user name of the person who collected the money or paid the refund
- The amount collected or refunded
The total amount collected, minus any refunds, appears at the bottom.
Sort Order
The list is sorted by the criterion you choose in the Sort by list.
- If you choose Date, it is sorted by date, then by patron name.
- If you choose Patron, it is sorted by patron name, then by date.
- If you choose Reason, it is sorted by reason for the fine, then by date, and then by patron name.
- If you choose Performed By, it is sorted by the user name of the person who collected the money or paid the refund, then by date, and then by patron name.
Additional Details
If you need a list of outstanding (unpaid) fines, generate a Current Checkouts/Fines report.
If you need to send out fine notices, generate them with Current Checkouts/Fines. Make sure to select the format for Notice on the first page.