Create Custom Reports with Destiny's Report Builder (Library Manager, Resource Manager, Textbook Manager)
With Report Builder, you can create a variety of reports. Just choose the information and format you want, and Destiny builds the report for you.
Quick steps to build a custom report:
- Select areas of the product to report on, such as library, patron or general.
- Select an array of information, such as barcode, status, category or author.
- Group information with the selection of sort order.
- Determine column order sort.
- Use limiters, such as totals and sub-totals.
More things to do after generating a report:
- Save and run your report as needed.
- Duplicate it if it is a complex report.
- Import/export to share it across sites.
- Add it to My Favorites.
Build the Report
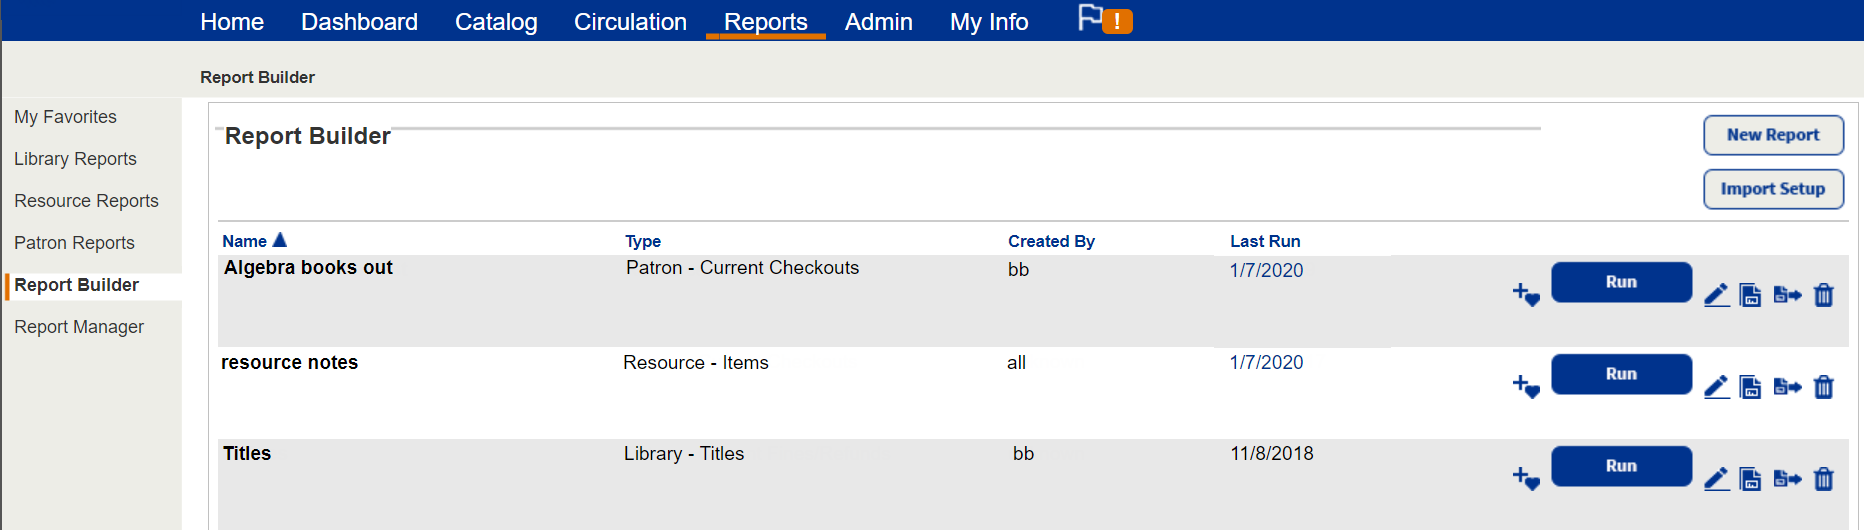
To access Report Builder:
- Select Reports > Report Builder.
- Click New Report.
- In the first drop-down, select your report type. Depending on which Destiny product(s) you have, you can choose from the following:
- Resource
- General
- Library
- Patron
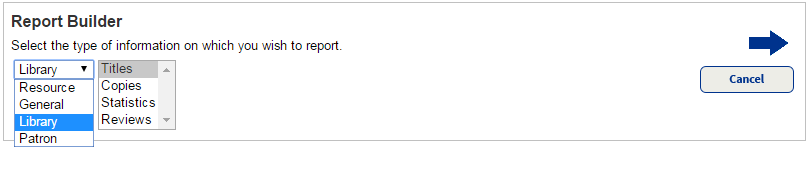
- From the second drop-down, select a specific topic.
- Click
 .
.
Complete the following steps to build the report. When you complete each step, click ![]() to move to the next step. If you change your mind about any selections, you can return to the previous step by clicking
to move to the next step. If you change your mind about any selections, you can return to the previous step by clicking ![]() .
.
Step 1: Choose the information to include in the report
In Step 1, choose which fields to report on. You can select all fields, but you must select at least one field to proceed to the next step.
- If you selected Resource above, you can choose specific Resource Types to include in your report. In the Template section, click Update. The Select Resource Types page appears.
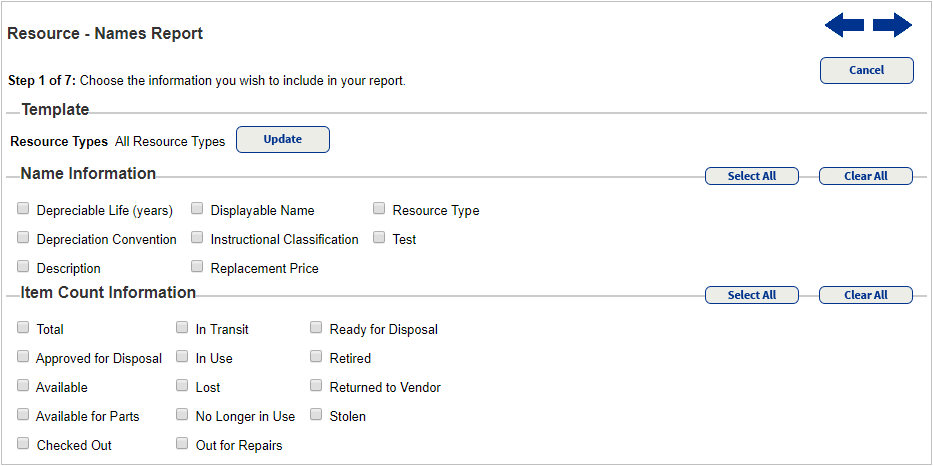
Select the resource types that are to appear in your report, and click OK to return to Report Builder.
- In the Information sections, select the fields you want to include in the report.
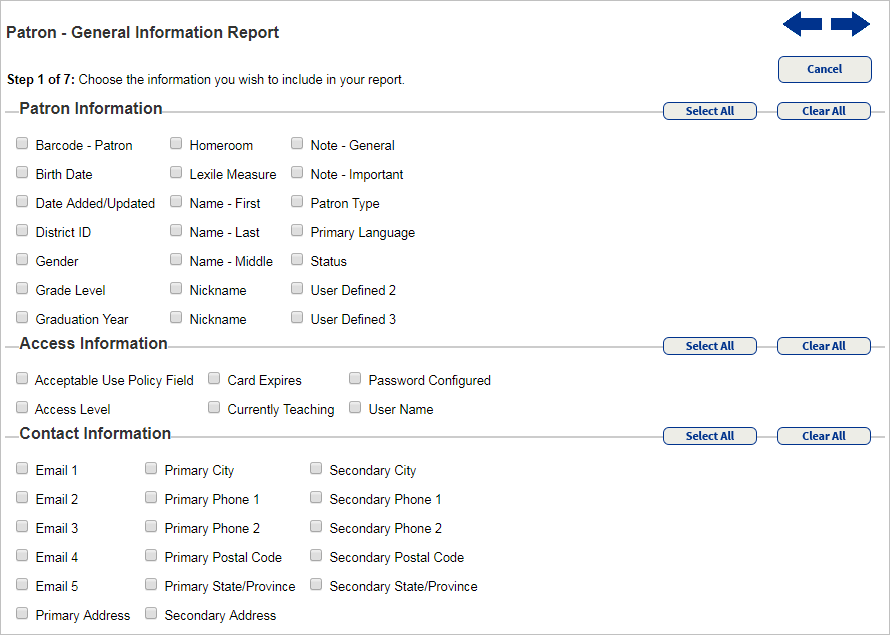
- Click .
Step 2: Group the information
In Step 2, you can arrange the information selected in Step 1 into groups. Grouping is not required, but it helps make your report easier to understand. If you just need a simple list of statistics, you might decide not to group the information.
- In the first Group by drop-down, select your primary grouping option.
- In the second Group by drop-down, choose whether the information should be in ascending or descending order.
- If you selected more than one field in Step 1, you can select a second field from the ...then by drop-down and a third in the ...and finally by drop-down; then choose an ascending or descending order.
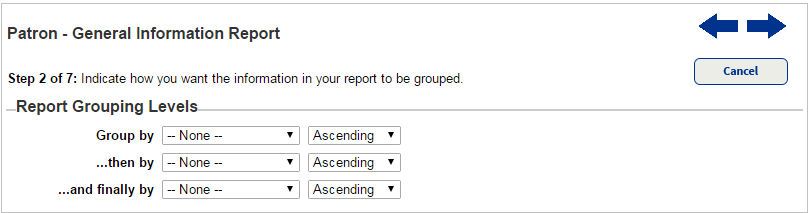
- Click .
Step 3: Arrange the columns
Step 3 lets you set the order of the remaining fields in your report. The fields in this step display as columns from left to right. The field at the top of the list is the first column on the left. By default, the remaining fields are arranged alphabetically in columns.
- Select a field, and then click Move to Top, Move Up, Move Down or Move to Bottom.
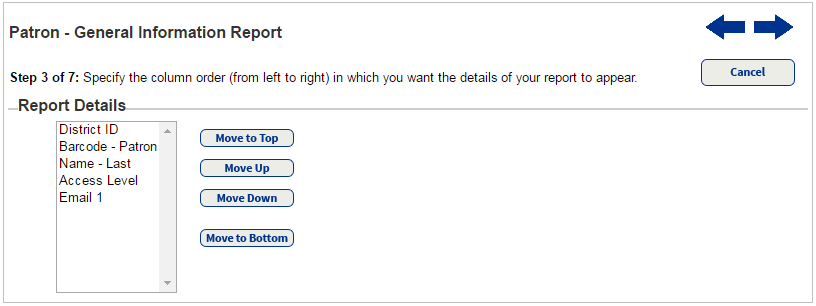
- Once you arrange the information in the way you want, click to go to the next step.
Step 4: Sort the information
In Step 4, you can specify the sort order for the information in each of the report’s columns. The fields available to you in this step are the fields you selected in Step 1, excluding the fields you grouped by in Step 2. By default, reports sort in ascending order.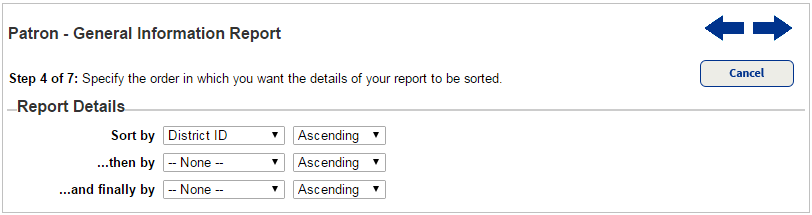
- Select the primary sorting option from the Sort by drop-down.
- In the drop-down next to Sort by, choose whether the information should be in ascending or descending order.
- If you selected more than one field in Step 1, you can select a second field from the ...then by drop-down and a third in the ...and finally by drop-down; then choose an ascending or descending order.
- Click .
Step 5: Summarize the information
Step 5 lets you perform calculations on any numeric fields or count records in your report. The options you select appear at the end of the report and at the bottom of each primary group column.
To indicate how you want the information in the report summarized:
- Select the appropriate checkboxes from the following options:
Checkbox Description Count
Provides either an overall count of records in your report or a count of each specified field group.
Total
Calculates the total sum of records in the report.
Average Calculates the total value of entries in a column divided by the number of entries in that column.
Smallest Value
Presents the lowest value of a given column.
Largest Value
Presents the largest value of a given column.
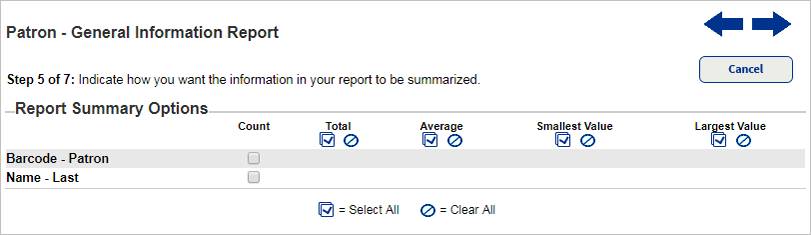
- Click .
Step 6: Limit the information
Step 6 helps give your report more focus by limiting for selected criteria. For example, if you are running a patron report, you can limit it to patrons added/updated within a date range. You can set up to 10 limiters.
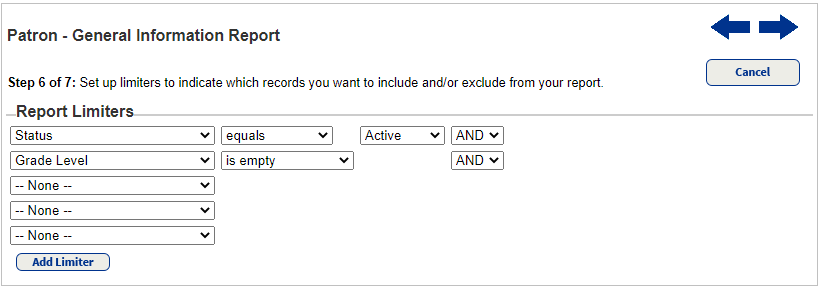
- From the first drop-down, select a limiter. An operator list and a value option for the selected field appear. For example, when you select Date Added/Updated, the operator list for limiting the date range and a value field for choosing the date appears.
- In the Operator drop-down, select an operator.
- In the Value field, type a value.
- In the drop-down next to the value field, select one of the following:
- AND: Includes all records that meet every limiter
- OR: Includes all records that meet at least one of the limiters
- Repeat the previous steps to add any additional limiters. You can set up to 10.
- Click .
Step 7: Save the report
In Step 7, you can run and save the report setup for later use.
- In the Name field, type a name for the report.
- If this is being created at the district, use the Available for drop-down to choose district users, site type or school the report is for.
- In the Description field, you can type notes about the report.
- There are two options for saving the report:
- To save the report and run it immediately, click Save & Run.
- To save the report setup for later use, click Save.

- If you selected Save & Run in the previous step, Report Manager displays your report at the top of the list and automatically updates its status. When the status is Completed, do one of the following:
- To view the job summary, select View.
- To view your report online, select HTML.
- To download the report as an XML file, which can be exported into Microsoft Excel, select XML.
- To open or save a spreadsheet file in Excel, select Excel®.
If a report is created at the district for a site, it appears in the list of reports with the district icon (![]() ) next to it.
) next to it.
Related Content
For information – including Quick Reference Guides (QRGs) and videos – about custom reports and Report Builder, see Using Reports & Fines (Library Manager) and Reports (Resource Manager).