Patron Import Converter (Simple)
Contents
- Process Overview
- CSV File Requirements
- Get the Patron Import Converter
- Configure the Patron Import Converter
- Run the Patron Import Converter
- Upload the XML file to Destiny
Getting Started
While you can manually add or edit a patron in Destiny, the standard method for adding and updating patron records is to import an XML file at the district level.
You can use the Patron Import Converter (PIC) to change patron data from a comma-delimited format (a CSV file) into an XML (extensible markup language) file format that conforms to the Destiny patron file format for import. This document provides an overview of the Patron Import Converter process. Use it to guide you through configuring the PIC, converting your CSV data, and uploading the XML file into Destiny.
With the PIC, you can:
- Upload data for one school or for an entire district in one file.
- Add, update, transfer or delete patrons.
- Compare the previous and current CSV files, and then convert and upload only the updated records.
- Automate the conversion and upload processes.
The PIC can quickly process very large CSV files. The Patron Import Converter replaces the Transform utility and the Patron Conversion utility.
|
Note: The PIC does not accept files with tab-delimited or fixed-length fields. It does accept comma-delimited input files and CSV files. |
Once you have configured the PIC, you can automatically convert and upload your patron data on a regular basis using Destiny's Scheduled Patron Update feature.
|
Note: To use features involved in uploading, scheduling or modifying the scheduled process, you must have the Manage Patrons for the District permission. |
Process Overview
With the Patron Import Converter, you will convert data from a CSV format into the Destiny XML format, and upload it using the following procedures:
- Export patron data from your Student Information System (SIS) to a CSV text file.
- Assign the fields in your CSV file to those in Destiny, and then set up default values for those fields not in your CSV file.
- Add any mapping or formatting to the selected fields.
- Save the configuration as a “properties” file (mapping.properties or student.properties).
- Upload the file you have to Destiny, or
- Scheduling a job based on a CSV file being copied to your Destiny server.
- Scheduling a job to pick up a CSV on your SFTP server.
- Scheduling a job to pick up a CSV on Follett’s Hosted SFTP server.
CSV File Requirements
Destiny cannot directly extract the patron data from an Student Information System (SIS). You must export the data to a CSV file, and convert it to XML format, before Destiny can process the information.
| Note: You may need to contact your SIS vendor for information about exporting patron data to a CSV data file. |
There is a lot of flexibility in the format of the CSV file. The CSV file must have:
- The expected values in the expected CSV fields.
- At least one field that maps to a Destiny patron record field.
- Either a District ID or a barcode number and Site Short Name to uniquely identify each patron.
- A Last Name field.
About Character Encoding
For the CSV file, the PIC uses Windows Latin (Cp1252) encoding by default. If it encounters any illegal characters, the conversion process fails.
You can use any of the following character encodings for the CSV file:
- ASCII
- UTF8
- Cp1252
- UTF-16
- ISO8859_1
|
Notes:
|
Available Fields
The following table defines the fields that can be updated. Besides the required fields mentioned above, you can include any or all of these fields in your CSV file. It is helpful to share this list with those who will be creating the CSV, so they can see the available fields and limitations of those fields.
|
Note: For fields that require specific output (see the Comments in each field for expected values), you can use the Patron Import Converter’s mapping feature. If a field will have a consistent value that can be used to assign another field, you can map those CSV fields to the values Destiny is expecting. See Map the Fields. |
| Destiny Field | Configuration File Field | Max Length | Comments |
|---|---|---|---|
|
Site Short Name |
field_siteShortName |
10 |
Required. Must match site short name, or an Alias, entered in district configuration. If not in the CSV file for a single school, enter it in the properties file. |
|
Barcode |
field_barcode |
14 |
Required when adding a patron. Must be unique in a school. Value of “autoassign” causes Destiny to assign the next available barcode number to the patron. Cannot use “autoassign” when matching by Barcode and Site short name. |
|
District ID |
field_districtID |
40 | Optional if not used for matching or required on Edit District page. Must be unique in the district. |
|
Last Name |
field_lastName |
42 |
Required. |
|
First Name |
field_firstName |
42 |
|
|
Middle Name |
field_middleName |
42 |
|
|
Nickname |
field_nickname |
30 |
|
|
Patron Type |
field_patronType |
30 |
If not specified, default is used. If unknown, Patron Type is created. S and F not accepted for Student and Faculty. |
|
Access Level |
field_accessLevel |
30 |
If not specified, default is used. |
|
Resource Group |
field_resourceGroup |
30 |
Only applies to Destiny Resource Manager sites. If not specified, default is used. |
|
Status |
field_status |
1 |
A, I or R (Active, Inactive or Restricted) Defaults to A if blank or invalid. |
|
Gender |
field_gender |
1 |
M, F, U. Defaults to U (Unspecified) if blank or invalid. |
|
Homeroom |
field_homeroom |
90 |
|
|
Grade Level |
field_gradeLevel |
30 |
|
|
Card Expires |
field_cardExpires |
10 |
Format as required on Edit District page. |
|
Acceptable Use Policy on File |
field_isAcceptableUsePolicyOnFile |
5 |
True, T, False, F, Yes, Y, No or N |
|
Is Teacher |
field_isTeacher |
5 |
True, T, False, F, Yes, Y, No or N |
|
User Defined 1 |
field_userDefined1 |
30 |
|
| User Defined 2 | field_userDefined2 |
30 |
|
|
User Defined 3 |
field_userDefined3 |
30 |
|
|
User Defined 4 |
field_userDefined4 |
30 |
|
|
User Defined 5 |
field_userDefined5 |
30 |
|
|
Graduation Year |
field_graduationYear |
4 |
YYYY |
|
Birth Date |
field_birthdate |
10 |
Format as required on Edit District page. |
|
User Name |
field_username |
50 |
Optional. Unique within the district. Required if updating the Password field. |
|
Password |
field_password |
50 |
|
|
Email 1 |
field_emailPrimary |
128 |
|
|
Email 2 |
field_emailSecondary |
128 |
|
|
Email 3 |
field_email3 |
128 |
|
|
Email 4 |
field_email4 |
128 |
|
|
Email 5 |
field_email5 |
128 |
|
|
Address 1 Line 1 |
field_addressPrimaryLine1 |
42 |
|
|
Address 1 Line 2 |
field_addressPrimaryLine2 |
42 |
|
|
Address 1 City |
field_addressPrimaryCity |
42 |
|
|
Address 1 State |
field_addressPrimaryState |
42 |
|
|
Address 1 Postal Code |
field_addressPrimaryZipCode |
20 |
|
|
Address 1 Phone 1 |
field_addressPrimaryPhoneNumberPrimary |
30 |
|
|
Address 1 Phone 2 |
field_ addressPrimaryPhoneNumberSecondary |
30 |
|
|
Address 2 Line 1 |
field_addressSecondaryLine1 |
42 |
|
|
Address 2 Line 2 |
field_addressSecondaryLine2 |
42 |
|
|
Address 2 City |
field_addressSecondaryCity |
42 |
|
|
Address 2 State |
field_addressSecondaryState |
42 |
|
|
Address 2 Postal Code |
field_addressSecondaryZipCode |
20 |
|
|
Address 2 Phone 1 |
field_ addressSecondaryPhoneNumberPrimary |
30 |
|
|
Address 2 Phone 2 |
field_ addressSecondaryPhoneNumberSecondary |
30 |
Get the Patron Import Converter
There are many ways to access the PIC. Follett recommends the following steps:
- Create a working folder in an easy-to-access location.
- Find the Patron Import Converter files in one of the following ways:
To Then... Download from Update Patrons - Log in to Destiny as a District User with
- Select Admin > Update Patrons > Schedule sub-tab.
- Click Schedule It. The Schedule Patron Update page appears.
- Click the Patron Import Converter link, and choose to run or download and run based on your browser configuration.
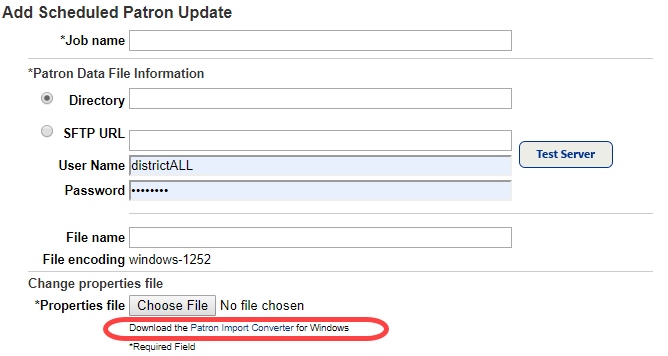
- Extract to your working folder before use.
Use Download Tools - Log in to Destiny as a District Patron Manager.
- Select Admin > Download Tools sub-tab.
- Next to Patron Import Converter, click Download.
- Extract to your working folder before use.
Download all utilities
- Log in to Destiny as a Destiny Administrator.
- At the bottom of the Setup > District Options sub-tab, click Download.
- Extract to your working folder before use.
Browse server From the server, browse to your installation's \FSC-Destiny\fsc\bin folder. It should contain the following files:
- PatronImportConverter.exe
- PatronImportConverter.l4j.ini.sample
- patronimport.properties.sample
- Log in to Destiny as a District User with
- Copy your CSV file to the working folder.
Configure the Patron Import Converter
With the Patron Import Converter application, you can open, edit and save your properties file. Once you have selected the parameters for matching, skipping and deleting, you can run the CSV-to-XML conversion from the application.
If you prefer to edit the properties file directly, see the
The easiest way to configure the properties file is to open the CSV file.
|
Note: If you do not have the CSV file but know its contents and format, you can configure the properties file without opening the CSV file. |
Configure the properties using the following steps:
- Map the fields in the CSV file to those in the Destiny patron record.
- Specify the format for dates, change incoming CSV field values to those that Destiny uses, and enter custom mapping and formatting where needed.
- Define the way the XML Upload matches patrons and under what conditions the upload should update or delete patrons.
Prepare CSV File
- In your working folder, double-click PatronImportConverter.exe.
Note: The PIC searches your computer's registry for a Java Virtual Machine (JVM). If it cannot find one, a browser window opens, allowing you to download the free JVM from Oracle. The website provides complete instructions. You may be required to have administrative access to download or install Java. Please contact your local IT Team if you encounter problems installing Java. After successfully downloading the JVM, try again.
- To select the CSV file, click Browse, and then find and select the file.
- The first several records appear on the Data Preview tab.
- If you do not open the CSV file, enter the Number of fields on each row.
- If you open the CSV file, the Number of fields on each row is automatically populated, and the fields are grayed out (disabled).
- To re-enable a field and clear the Preview pane, in the lower corner, click Clear.
- If your CSV file contains any header rows, next to the Data begins on row field, enter the row number of the first patron record. This is designed to skip rows that do not have the same number of fields that your patron data has. For steps to skip header rows (rows that define the names of the columns in the CSV), see Skip, Delete and Associate Patrons.
Map the Fields
You can map to any or all fields in the patron record. You can map the same CSV field to multiple Destiny fields. You do not have to map all fields in the CSV to Destiny fields.
- Open the Field Mapping tab.
- For each field in CSV file, find the corresponding Destiny Field, and click the CSV Input Field next to it. From the list that appears, select the corresponding field number.
- To verify the CSV field maps to the correct Destiny field, review the bottom pane: In the Sample Output column, verify the selection.
If none of the fields need special mapping or formatting, skip to Match Patrons.
Define PIC Action for Empty Fields
You can define the Patron Import Converter's action when it encounters an empty CSV field that you mapped to a Destiny field:
- To clear the existing value in a Destiny field that's missing an incoming CSV value, select the checkbox in the Include Empty Tag column. This inserts an empty field.
Example: In the Include Empty Tag column next to <FirstName></FirstName>, select the checkbox, and for records without incoming values, the upload will clear the Homeroom and Grade Level fields.
- To preserve the existing value in a Destiny field that's missing an incoming CSV value, deselect the checkbox in the Include Empty Tag column. This inserts no element in the XML file, thus preserving the existing value in Destiny. In the example above, the Upload will preserve all the existing values except Homeroom and Grade Level for records without incoming values in them.
- To have the Patron Import Converter insert the contents of another field when it encounters an empty field, see
Format the Fields
If you need to specify the format for dates, change the incoming CSV field values to those that Destiny uses, or apply special processing to any fields, use the options in the Format column.
Format Date Fields
For a field containing a date, click in its Format column and select DATE from the list that appears. The Choose Date Format pop-up appears.
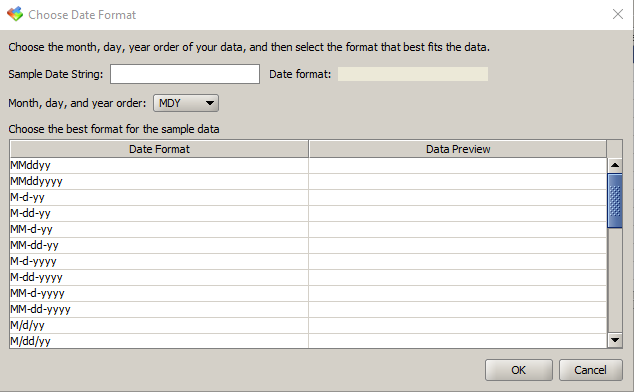
- Review the Sample Date String from the CSV file and, from the Month, day, and year order drop-down, select the order.
- In the Date Format column, select the format that best matches the CSV file.
- Click OK to close the pop-up.
- To verify your choice, select any of the records in the bottom pane of the Field Mapping tab, and then check its date in the Sample Output column.
- If you need to reopen the Choose Date Format pop-up, click the field name in the Destiny Field column on the Field Mapping tab.
Change Incoming CVS Values to Destiny Values
|
Note: Follett recommends using Site Short Name Aliases to map Site Short Names.
|
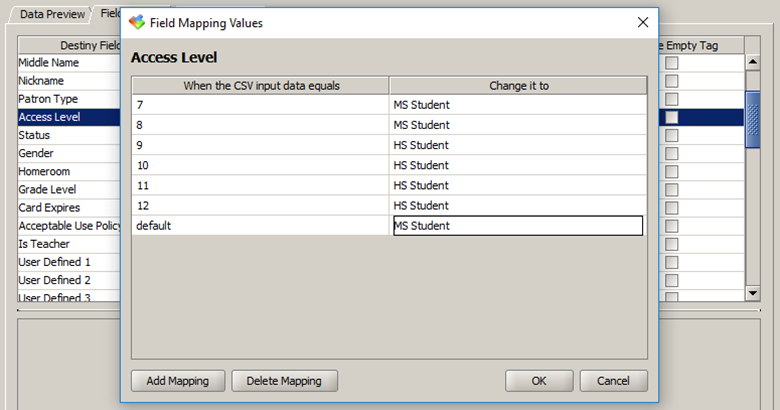
- For fields other than Site Short Names whose values require mapping, select MAP in the Format column next to the field. The Field Mapping Values pop-up opens.
- Click Add Mapping.
- For each row:
- In the When the CSV input data equals field, enter the value from the CSV file.
- In the Change it to field, enter the replacement value.
- Click OK when you are done.
- (Optional) To define a default value for this field (a value to use if the CSV data does not match any other defined mapping values), enter "default" in the When the CSV input data equals field, and a value in the Change it to field.
- To verify your mapping, select any of the records in the bottom pane of the Field Mapping tab, and then check its mapped value in the Sample Output column.
- If you need to reopen the Field Mapping Values pop-up, click the field name in the Destiny Field column on the Field Mapping tab.
|
Example: Your CSV file contains the numbers 7 through 12, in a Grade Level field and you have mapped this field to the Destiny's Grade Level field. If the MS Student Access Level and HS Student Access Level exist in Destiny, you can also map this field to them:
|
Enter Custom Mapping and Formatting
For a field whose values require special formatting, concatenation or added text, select CUSTOM in the Format column. The Edit Custom Format pop-up appears.
- Enter your custom formatting string.
Important: Do not add quotation marks or CDATA statements. The PIC inserts the necessary CDATA statements into the XML file.
- Click OK.
- To verify your formatting in an open CSV file, select any of the records in the bottom pane of the Field Mapping tab, and then check its formatted value in the Sample Output column.
Examples:
- Your CSV file contains a field for the Homeroom number and a field for the Homeroom adviser. If you would like to enter both in Destiny's Homeroom field, specify the field numbers, surrounding them with braces: {6} {13} and insert text (a "literal string") to improve readability: " - Room".
- You only have one site in Destiny and do not have the required Site Short Name field in your CSV. If you want everyone to be in Main Street High School (Site Short Name = MSHS):
- Choose CUSTOM from the Format Column without choosing a CSV Input Field.
- Type MSHS into the Edit Custom Format fieldthat appears.
- Click OK.
Now all patrons will be given a MSHS Site Short Name in the XML.
If you need to reopen the Edit Custom Format pop-up, double-click the field name in the Destiny Field column on the Field Mapping tab.
For more information on concatenation, substrings and date or number formatting, see
Match Patrons
Before importing them, Destiny checks to see if incoming patrons already exist in your database.
Destiny can determine whether an incoming patron is a match to an existing patron by comparing either the District ID or the Site Short Name and the patron's barcode number.
|
Note: Follett recommends that you use District ID (the unique number for the patron in the district). This enables the conversion or upload process to transfer patron records from one school to another. Follett also recommends only matching on Barcode and Site Short Name when you need to update the District ID for patrons. |
- Open the Patron Matching tab.
- Under Match patrons using their, select the unique identifier your school or district uses.
Skip, Delete or Associate patrons
By default, the PIC adds information to the XML file that instructs Destiny to add or update each incoming patron record. However, you can configure the PIC to skip, delete or associate patron records with an additional school, based in criteria you define. Once you define the conditions, the PIC can identify the records and perform the correct action.
|
Important: Be sure to choose the setting ANY (OR) or the setting ALL (AND) carefully:
Example: If you want to skip based on the Patron Type field being Teacher or Faculty, it must be set to ANY, since no patron record could have a Patron Type of Teacher AND Faculty. |
| To | Then... | |
|---|---|---|
|
Skip Patrons
|
As the Patron Import Converter processes each CSV record, it tests the data. If the data matches the conditions you define, the PIC skips the record.
|
|
|
Delete Patrons
|
As the Patron Import Converter processes each CSV record, it tests the data. If the data matches the conditions you define, the PIC tells Destiny to delete the patron record.
|
|
|
Associate Patrons |
While most patrons have a single site association – the school where they teach or attend classes – the Patron Import Converter can associate patrons with additional sites. You may want to do this for students who attend classes, or faculty who teach classes, at multiple schools. When you upload a patron record for the first time, a patron's site association is determined by the Site Short Name in the patron record. On subsequent uploads, if the Site Short Name is different, Destiny updates the Site Short Name – in effect, transferring the patron to that school. Once you set up your Multiple Association Rules, the PIC can tell Destiny to add a site association to the patron record instead of replacing it. Destiny designates the first site association as the Primary site and any additional associations as Secondary sites.
The PIC will tell Destiny to add a site association to any patron record it matches, instead of transferring it between sites. |
Save the Configuration in the Properties File
Now that you have configured the PIC, click Save to save the configuration in the properties file. You will need to provide a filename to save the settings:
- If you are working on your local computer, provide a name of your choosing, such as studentupdate.properties
- If you are working on configuring a patron upload job for automated processing, make sure that you choose this properties file in the Change properties file section of the Scheduled Patron Update configuration.
- If you are working with an existing configuration used by Destiny's Scheduled Patron Update feature, save the changes you have made with the existing patronimport.properties filename, and upload it in the Change properties file section of the Scheduled Patron Update configuration.
Run the Patron Import Converter
Once you have edited the properties file, you can test your configuration by running the Patron Import Converter to generate the XML file. When satisfied, you can then manually upload the XML data and upload the configuration file into Destiny's Scheduled Update job. Follett recommends running the PIC once when configuring a scheduled upload, as any issues with the PIC would be encountered during the conversion process of the Scheduled Patron Upload.
- Click Run.
Note: You must save your properties file before the Run button becomes available.
- Choose a File name for the XML file you are going to create. Follett recommends saving it in your working folder, and saving it with a filename that relates it to the CSV and properties file it is converted from.
- Allow the process to complete. The PIC will try to open the created XML file with the assigned program (typically Internet Explorer in Windows).
- The PIC creates two files: the XML file and a log file named <filename>-log.txt.
The PIC writes any exceptions to the log file. At the end of the log file is a summary count of the number of rows skipped and the number of errors.
Upload the XML File to Destiny
Manual Upload
The last step in the process is to upload the XML file to Destiny.
|
Important: Do not use Admin > Import Patrons. It is not designed to accept XML and will respond with a “header” error in the Job Summary. |